If you use Virtualbox on Windows and your virtual machine is slow or doesn’t start at all, then this article is for you.
Most of the time I work on a virtual machine with Linux system. Some time ago I reinstalled my host Windows system and had to set up the virtual machine from scratch. Unfortunately, newer versions of Windows and my company group policy caused a lot of problems.
Table of Contents
Symptoms
If you see a green turtle icon in the lower right corner of the virtual machine window, it means that your virtual machine is running in slow mode.
The correct icon, indicating that VT-x/AMD-V support is in use,
is the letter V on a blue background/chip
If you can see the correct icon, but your virtual machine is slow, check that you have allocated the correct number of CPUs, RAM and video memory to it.
Cause
According to Microsoft’s documentation, this behavior occurs by design:
Many virtualization applications depend on hardware virtualization extensions that are available on most modern processors. It includes Intel VT-x and AMD-V. Only one software component can use this hardware at a time. The hardware cannot be shared between virtualization applications.
Virtualbox can be used on a Windows host where Hyper-V is running, but very slowly and this is an experimental feature. In the docs there is a note that host systems using this feature might experience significant Virtualbox performance degradation.
Solution
The solution is to disable all Windows services that depend on VT-x/AMD-V.
Below are the steps I had to follow to get everything working.
Hopefully they will help you too.
Note: It is recommended to back up your data and to create system restore points, before changing anything!
1. Disable Incompatible Windows Features
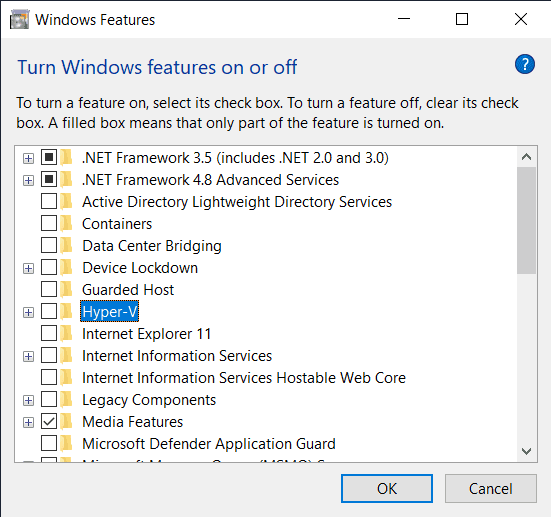
Go to Turn Windows features on or off - you can search that from start menu,
or find it in Control Panel.
Disable (untick) following services:
- Containers
- Guarded Host
- Hyper-V
- Virtual Machine Platform
- Windows Hypervisor Platform
- Windows Sandbox
- Windows Subsystem for Linux
2. Disable Hypervisor
Start Command Prompt as administrator and run:
bcdedit /set hypervisorlaunchtype off3. Disable Device Guard
-
Start
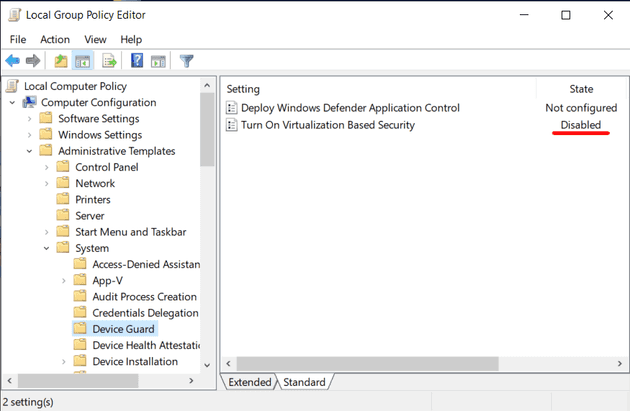
Edit group policy-gpedit -
Go to
Local Computer Policy>Computer Configuration>Administrative Templates>System -
Click on
Device Guard -
Set
Turn On Virtualization Based Securityto stateDisabled -
Close
Group Policy Editor
4. Disable Windows Defender Credential Guard
-
Start
Command Promptas administrator and run:reg delete "HKLM\SYSTEM\CurrentControlSet\Control\Lsa" /v "LsaCfgFlags" /f reg delete "HKLM\SOFTWARE\Policies\Microsoft\Windows\DeviceGuard" /v "LsaCfgFlags" /f reg delete "HKLM\SOFTWARE\Policies\Microsoft\Windows\DeviceGuard" /v "EnableVirtualizationBasedSecurity" /f reg delete "HKLM\SOFTWARE\Policies\Microsoft\Windows\DeviceGuard" /v "RequirePlatformSecurityFeatures" /f mountvol X: /s copy %WINDIR%\System32\SecConfig.efi X:\EFI\Microsoft\Boot\SecConfig.efi /Y bcdedit /create {0cb3b571-2f2e-4343-a879-d86a476d7215} /d "DebugTool" /application osloader bcdedit /set {0cb3b571-2f2e-4343-a879-d86a476d7215} path "\EFI\Microsoft\Boot\SecConfig.efi" bcdedit /set {bootmgr} bootsequence {0cb3b571-2f2e-4343-a879-d86a476d7215} bcdedit /set {0cb3b571-2f2e-4343-a879-d86a476d7215} loadoptions DISABLE-LSA-ISO bcdedit /set {0cb3b571-2f2e-4343-a879-d86a476d7215} device partition=X: mountvol X: /d
5. Disable Virtualization-Based Security
-
Start
Command Promptas administrator and run:bcdedit /set {0cb3b571-2f2e-4343-a879-d86a476d7215} loadoptions DISABLE-LSA-ISO,DISABLE-VBS bcdedit /set vsmlaunchtype off
6. Restart PC and confirm changes
After a reboot, before the system boots, you will be asked
whether to disable Windows Defender Credential Guard and
Virtualization-Based Security.
You must confirm everything with the Windows button.
7. Set up script to fix things after each reboot (optional)
Unfortunately, after several reboots, my settings would reset and the problem would return. I suspect this is due to the fact that my computer is connected to a corporate domain and it updates the group policy from time to time.
My solution was to save the following script to a .cmd file
and set it to run (as admin) every time the computer starts up.
Download the file: disable_annoying_features.cmd
reg delete "HKLM\SYSTEM\CurrentControlSet\Control\Lsa" /v "LsaCfgFlags" /f
reg delete "HKLM\SOFTWARE\Policies\Microsoft\Windows\DeviceGuard" /v "LsaCfgFlags"  /f
reg delete "HKLM\SOFTWARE\Policies\Microsoft\Windows\DeviceGuard" /v "EnableVirtualizationBasedSecurity" /f
reg delete "HKLM\SOFTWARE\Policies\Microsoft\Windows\DeviceGuard" /v "RequirePlatformSecurityFeatures" /f

mountvol X: /s
copy %WINDIR%\System32\SecConfig.efi X:\EFI\Microsoft\Boot\SecConfig.efi /Y
bcdedit /create {0cb3b571-2f2e-4343-a879-d86a476d7215} /d "DebugTool" /application osloader
bcdedit /set {0cb3b571-2f2e-4343-a879-d86a476d7215} path "\EFI\Microsoft\Boot\SecConfig.efi"
bcdedit /set {bootmgr} bootsequence {0cb3b571-2f2e-4343-a879-d86a476d7215}
bcdedit /set {0cb3b571-2f2e-4343-a879-d86a476d7215} loadoptions DISABLE-LSA-ISO
bcdedit /set {0cb3b571-2f2e-4343-a879-d86a476d7215} device partition=X:
mountvol X: /d
bcdedit /set {0cb3b571-2f2e-4343-a879-d86a476d7215} loadoptions DISABLE-LSA-ISO,DISABLE-VBS
bcdedit /set vsmlaunchtype offHow To Create the Task?
-
Run
Task Scheduler-taskschd.msc -
In the left pane click on
Task Scheduler Libraryand then clickNew Folder... -
Type some name, for example:
My Tasks -
Click on the new folder and choose
Create Task... -
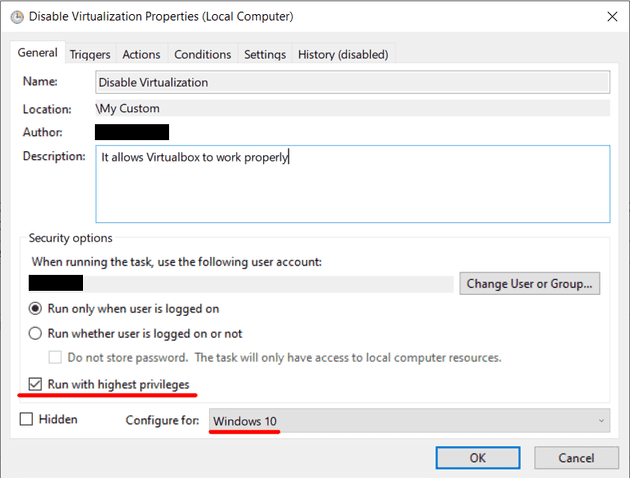
Under the
Generaltab, type in some name for the task, for example:Fix Virtualbox -
At the bottom tick
Run with highest privilegesand changeConfigure fortoWindows 10 -
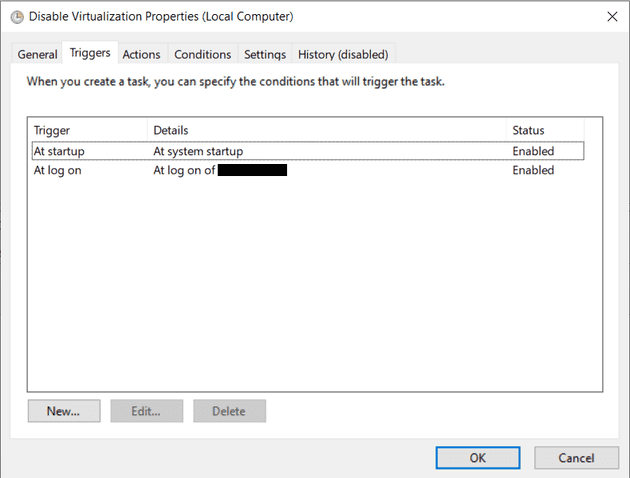
Under
Triggerstab, add two triggers:At startupandAt log on -
Under
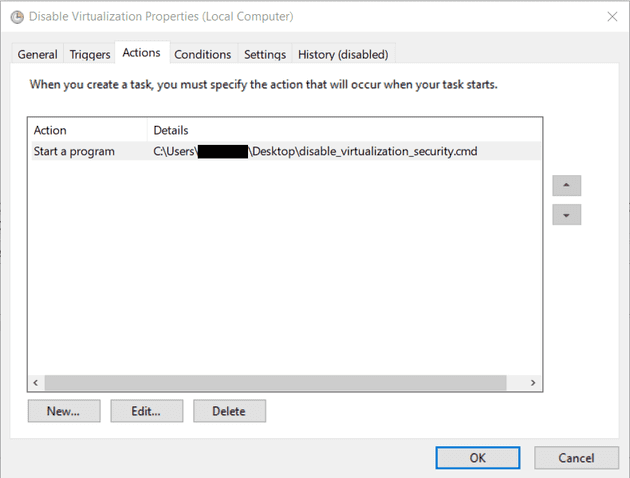
Actionstab, clickNew..., then choose action typeStart a programand provide the path to the script withBrowse...button -
Save the task and exit
The disadvantage of this solution is that I have to confirm that I want to disable the features with the Windows button every time I turn on the computer. But at least everything works fine.

